|
|
Preparing the assets for a given project means not only creating the individual media elements (videos, audio, still images and subpictures), but also ensuring that those elements are compliant with the requirements of the DVD-Video specification. The assets must also be in formats that can be used by the authoring application.
ReelDVD supports the following file and data formats:
Note: ReelDVD can transcode PCM and MPEG Audio files to Dolby Digital (2/0) format. ReelDVD does not support LZW-compressed TIFF files.
Most of the file formats allowed by the DVD specification were chosen because they support data compression to reduce the bit rate of the source media to fit within DVD’s available bandwidth. In DVD, bandwidth and bit rates are commonly expressed as megabits per second, or Mbps.
Bit Rate The amount of data in a given stream as measured over a given unit of time.In DVD, the maximum bandwidth available for program data is 9.8 MBps. That means the combined bit rates of the video stream and all audio and subtitle streams must fall within that limit. The more bandwidth allocated to audio, the less there is left for video, which can affect the quality of the video presentation.
There are two main areas in which you can affect the bit rates of the streams you use in order to ensure that the total falls within the 9.8 MBps limit:
Audio Both the format of the audio streams you use and the number of those streams have a big impact on total bit rate. Two-channel audio can range from 0.192–1.5 MBps or more. For example, using three audio streams at 1.5 MBps each would mean that only about half of the available bandwidth would be left for video.The following table lists required encoding parameters for video used in ReelDVD projects.
Note: The 29.97 fps frame rate is required by the DVD specification when encoding NTSC data. 30 fps is commonly used in video, but will not work in DVD.
The video codec (encoding/decoding system) used in the DVD-Video format is MPEG. The purpose of MPEG encoding is to reduce the amount of data required to store a series of frames while still allowing that series be reconstructed accurately by an MPEG decoder.
An MPEG encoder works by identifying picture information that is redundant from frame to frame, and converting that information into a code that can be stored more efficiently than the original signal. Depending on the degree of data-compression (how low a bit rate is used), the encoder can also treat similarly-colored pixels that are adjacent as if they are the same color. That means that some color information from the original image is lost, which can lead to reduced detail and “blocky” artifacts that noticeably degrade picture quality.
In static scenes, where there is very little frame-to-frame change in the color value of each pixel, frame-to-frame redundancy is high. That makes it easy for an encoder to store the scene at a relatively low bit rate without impacting picture quality. In fast-paced, visually complex scenes, less information is frame-to-frame redundant, so more bits are required to capture the details of the scene accurately.
MPEG-2 video can be encoded in one of two ways: either at a constant bit rate (CBR) or a variable bit rate (VBR). The situations in which each is used depends on the content of the video image, the length of the program material, and the size of the disc used (4.7 GB DVD-5, 8.5 GB DVD-9, etc.).
In CBR, the video is encoded at a consistent bit rate over the entire length of the program, regardless of the complexity of the material being encoded. Thus the average and the maximum (peak) video bit rate are the same.
In VBR, the bit rate is varied depending on the complexity of the material, with bits conserved in simple, static scenes so that they can be allocated to complex images or fast-moving sequences. A program might be encoded at the same average bit rate as with CBR, but the peak bit rate in complex scenes might be far higher than the average. This generally yields superior image quality in complex scenes, without adversely impacting static scenes. VBR can alternatively be used to get comparable quality to CBR but at a lower bit rate.
VBR offers an advantage over CBR only when the program material is beyond a certain length, determined by the overall capacity of the disc. On a DVD-5 (4.7 GB), for instance, if the program is shorter than about one hour, the average bit rate (the data capacity available for video divided by the duration of the video) is limited by the DVD format’s peak bit rate of 9.8 MBps, meaning that there are just as many bits available for complex scenes with CBR as with VBR. But as the length of the program increases, so too does the potential advantage of using VBR.
VBR encoding generally requires two (sometimes three) playback passes of the material being encoded. The encoder evaluates rate-of-change for each sequence of frames as peak, average, and minimum. After the system performs its analysis, the operator generally can intervene to perform final adjustments to the encoded results.
The aspect ratio (proportion of horizontal to vertical) of a standard television screen is 4:3. Theatrical films, however, have been shot for decades in widescreen aspect ratios, and many consumer and professional video cameras also now support a 16:9 aspect ratio for playback on widescreen televisions. During recording, the 16:9 video is electronically converted into an “anamorphic” signal, with the image horizontally squeezed to fit the standard 4:3 proportions (making the image appear tall and skinny if it is viewed on a standard 4:3 television).
When anamorphic video is played back from DVD on a widescreen television, the image is stretched out by the television to its original 16:9 aspect ratio, giving the full widescreen experience. When the content is played from DVD and displayed on a normal 4:3 television, the DVD player is able to automatically “letterbox” the video. The vertical size of the image is reduced by the DVD player until the picture just fits the horizontal dimension of the screen while still maintaining the intended 16:9 aspect ratio. The extra vertical space above and below is filled with a black matte (the letterbox). The ability of DVD players to letterbox allows greater flexibility for playback of widescreen content.
In order for a DVD player to output video at the proper aspect ratio, it looks for a “flag” in the video stream that indicates whether the content is 4:3 or 16:9. The flag is set during the video encoding process.
The DVD specification does not allow content in two different aspect ratios to be mixed in the same title. All video in a given project must be encoded as either 4:3 Standard or 16:9 Widescreen. Similarly, all still images in a project will be flagged by the authoring tool as either 4:3 Standard or 16:9 Widescreen when they are imported.
Many Encoders allow you to adjust other parameters of the MPEG encoding process. Below is a table of recommended values for such parameters. You should consult your encoder’s documentation for a more complete description of the meaning of each parameter.
When choosing among the many options for video assets, the rules for video require consistency in several areas once your choices are made. To recap, all video assets used in a given DVD title must be prepared with the same parameter settings in the following areas:
The following table lists the parameters for encoding audio with ReelDVD.
The types of audio supported for use in DVD-Video depend on the video system. NTSC players are required to support both linear PCM audio and Dolby Digital (AC-3) audio. PAL players also support MPEG Audio. Each of these formats can be used for mono, two-channel or multichannel (surround) sound, though few DVD players include multichannel outputs for PCM.
Linear PCM (WAV and AIFF formats) is audio that has been digitized using Pulse Code Modulation. Because it is not data-compressed during the encoding process, PCM is the highest-fidelity audio option, but also has the highest bit rate (leaving less bandwidth available for video).
Because PCM is an uncompressed data format, the bit rate is determined by the following formula:
PCM data bit rate (Kbps) = sample rate (48KHz) x no. of bits x no. of channels
Two-channel PCM audio at 16-bit/48KHz resolution has a bit rate of about 1.5 MBps.
Dolby Digital is a format that uses data compression to reduce the bit rate required to deliver sound at acceptable fidelity. The most common channel configurations for the format are Dolby Digital (2/0) and Dolby Digital 5.1.
The bit rate for Dolby Digital is specified during encoding. The recommended bit rate for Dolby Digital (2/0) is 192 Kbps (or 0.192 MBps). The rate for Dolby Digital 5.1 is commonly set to 384 Kbps, but 448 Kbps is preferred.
While Dolby Digital has a Karaoke mode, ReelDVD cannot be used to create Karaoke discs.
Unlike support for PCM and Dolby Digital, support for MPEG Audio is not required for all DVD players, particularly NTSC players. ReelDVD supports the MPEG Audio format. However, if you have MPEG Audio content that you would like to use on an NTSC project, ReelDVD is also able to automatically transcode the audio to the Dolby Digital (2/0) format. For information on the Audio Encoding Type for ReelDVD, see Project Tab.
In general, video source material is accompanied by synchronized audio. However, when the source material is digitized, the video and audio are broken into separate files, which must be resynchronized in the final program. In ReelDVD, one of two methods is used to achieve this synchronization:
Dolby Digital audio files support embedded timecode information that can be used to synchronize their audio to timecode information in the video stream. (MPEG and PCM audio files do not contain timecode information.) However, not all encoding systems actually put timecode in the Dolby Digital data they generate (or in the video). Refer to the documentation of your encoding system to see whether this capability is supported. If it is, use it. With timecode in both the video and audio, ReelDVD will be able to automatically synchronize the two (see Audio Streams for information on the Sync button in the Track window).
If valid timecode is not available to sync audio and video, or the audio format is PCM, ReelDVD will assume that the audio and video will be in sync if they start at the same time. Manual adjustment of the audio against the timeline in the Track window may be needed to achieve proper sync.
While you can choose among many options for audio assets, the rules for audio require consistency once your choices are made. The rules include:
ReelDVD supports the following image formats:
Note: ReelDVD does not support LZW-compressed TIFF files.
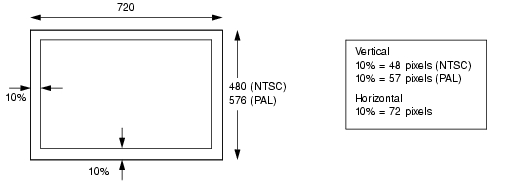
Television monitors are designed to overscan the screen area, meaning that the outer 5–10 percent of the picture on all sides (top, bottom, left and right) is not actually visible to the viewer. The degree of overscan varies depending on the individual TV. (Computer monitors do not overscan).
The safe area is the portion of a video picture that will definitely be seen when displayed on a television. When preparing images for DVD, it is important not to place menu buttons and subtitles beyond the safe area (in the 10 percent of the image area that is closest to the edges), where they will not be seen by the viewer. The safe area is not a concern for projects intended for viewing only on computer monitors.
When creating still images for a 16:9 Widescreen project, special steps are required to ensure that your images appear correctly in the final product. You should create your images initially at a resolution of 854x480. Then, just before importing the image into ReelDVD, resize the image to 720x480, therefore recreating the anamorphic “squeezing” effect that is performed on the widescreen video. When the content is played back, it will be stretched back to its original widescreen aspect ratio.
Note that if you forget to resize your images before importing them, ReelDVD will do so automatically. However, any subpicture overlays you have created for these images may not align properly afterward. See Menu Subpictures for 16:9 Widescreen for more information.
Still images are generally created in graphics programs such as Adobe Photoshop that allow the artist to use multiple layers to create a composite image. These layers are often “flattened” before the final image is output. ReelDVD, however, allows you to use the layers in a layered Photoshop file (.psd) to automatically define subpicture overlay masks and button hotspots for a menu.
When a layered Photoshop file is imported into ReelDVD, all layers in the original Photoshop file that were set to visible in Photoshop will be flattened into the background image. But these layers will also be displayed in the Select Layers dialog (see Select Layers Dialog), where each layer can be used as a mask that defines the hotspot for one of the menu’s buttons.
Because ReelDVD will treat each visible layer in the Select Layer dialog box as one button, the way the Photoshop file is prepared will determine whether the buttons based on layers will turn out as envisioned. Follow these guidelines when preparing the files:
A subpicture is an image that is overlaid on top of the program material (motion video or still image) in the video stream. Subpictures are used for menu button highlights and for subtitles.
On menus, subpictures are used in conjunction with a background to create the composite menu image seen by the viewer. For subtitles, subpictures are displayed in series, with multiple subpictures making up a subtitle stream.
In ReelDVD, each subpicture is categorized as one of three specific types: Menu, Simple and Infinite. See Subpicture Streams for a full description of subpictures and subpicture types.
Several different file formats can be used when creating subpicture files for use on menus or as subtitles. The table below outlines some general guidelines:
| |
File Types
|
No. of Colors
|
Image Size
|
|---|---|---|---|
|
Still images
|
Photoshop (flattened image), BMP, JPEG, PICT, TIFF, Targa
|
4 (red, blue, black, and white)
|
NTSC, Max. 720x480
PAL, Max. 720x576
|
Note: ReelDVD does not support LZW-compressed TIFF files.
Additional rules for creating subpictures include:
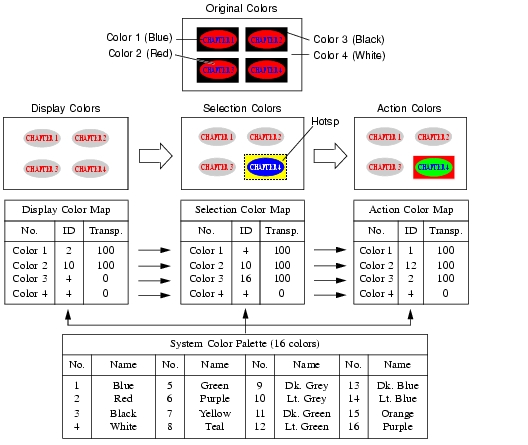
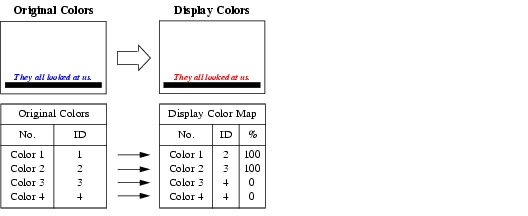
Each RGB pixel in the original subpicture mask overlay is mapped to a specified color and transparency for each of the three possible states of menu buttons: (1) menu display, (2) button selection, and (3) button activation.
Figure 2 illustrates how the button colors change depending on the button state. The Display Color settings are the initial settings used when the menu is first displayed. The Selection Color settings are used to highlight the selected button as the user navigates the menu; as each button is selected, the colors change only within the confines of the selected button’s rectangular “hotspot” (the defined button area). Finally, when a selected button is activated, the colors used for the selected button change to the Action Colors.
As we learned earlier, a DVD player will automatically letterbox 16:9 video and still images for playback on a standard 4:3 television. However, DVD players do not letterbox widescreen subpictures. Instead, a letterboxed subpicture stream must be created during the authoring process.
If your project uses 16:9 video, ReelDVD will automatically create the required letterboxed subpicture stream by reducing the vertical resolution of the original (widescreen) subpicture image. This step is necessary to ensure that the subpicture image is properly aligned with the letterboxed video or still image when displayed on a 4:3 television, but some graphical data is lost in the process. To avoid potential problems with interlace flicker and lost horizontal lines, it is recommended that all horizontal lines in the original subpicture images be at least 4 pixels thick.
Note that the automatic generation of letterboxed subpicture streams is transparent to the ReelDVD user, and does not use any of the subpicture streams per Track that are available in ReelDVD projects. ReelDVD will automatically add one letterboxed subpicture stream for each of the available streams you use.
Subtitles in DVD use the same subpicture overlay capabilities as menu subpictures, and the subtitle color mapping process is similar in principle to menu subpicture color mapping (described in Subpicture Assets).
In ReelDVD, subtitles can be added with the built-in Subtitle Editor, or they can be prepared as subpicture images in an external graphics application and then imported into the project. This section provides information on how to prepare external subpicture images for subtitles (see Create Subtitle Dialog for information on using the built-in Subtitle Editor).
Subtitle images are generally created in a graphics program such as Adobe Photoshop. The images need not actually be text; graphical images can also be displayed with DVD’s subtitling feature.
The following guidelines apply when creating subtitle images for import:
The names you give to individual image files in a series of subtitles is important. The name of a subtitle identifies the image, its location within the subtitle sequence, and the type of image it is. ReelDVD creates a subtitle asset folder and registers the subtitle images sequentially.
Use the following convention for naming subtitle images:
ImageName.subpicture#.ImageFormat
Example: a motion video clip with the file name Twilight has one subpicture stream, a series of 150 subtitles. All of the images have been created in the TIFF image format. The images would be named:
Twilight.1.tif
Twilight.2.tif
Twilight.3.tif
…and so forth.
The 150th subtitle file would be named Twilight.150.tif.
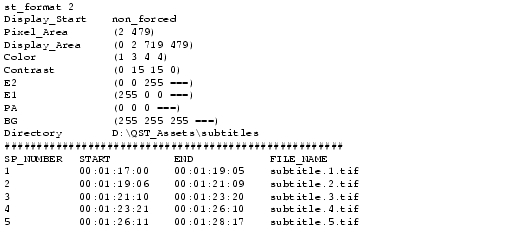
To determine which subtitle settings to use for a particular sequence of subtitle images, ReelDVD looks at a subtitle script file (.sst). You can create the script in any text editor. A typical subtitle script file is shown in Figure 3.
The definitions for the script file settings are as follows:
st_formatThe identifying number of the subtitle data stream. ReelDVD currently supports subtitle format 2 only.
Display_Start The options are Forced or Non_Forced. When set to Forced the subtitles are always On; Non_Forced means the Subtitle On/Off feature on the DVD player remote control can be used to turn subtitles On or Off.
Set the definition as follows:
The first three positions are the RGB settings, respectively. The equal signs (===) in the fourth position of the setting tell ReelDVD that the color must match exactly.
Directory The directory path to the subtitle image files.Note that if the directory path is changed after the subtitle script file is created (if the subtitle folder is moved to a new location), ReelDVD will not be able to locate the subtitle folder. In that case, you will need to edit the directory path in the subtitle script file to set the correct path.
separator The separator line separates the settings from the list of subtitles. You must use at least two # signs in this line.
|
SP_NUMBER
|
The number of the subtitle in the subtitle stream.
|
|
START
|
The start time of the subtitle.
00:01:05:00 = hour:minute:second:frame
|
|
END
|
The end time of the subtitle.
00:01:07:05 = hour:minute:second:frame
All subtitles that have an end time are defined as Simple subtitles; place a “–” (dash) instead of a timecode in the END field to set a subtitle to Infinite. See Subpicture Streams for a description of the Simple and Infinite settings.
|
|
FILE_NAME
|
The name of the subtitle image. Note that there is a naming convention you must use when creating subtitles. See Subtitle Naming Conventions for details.
|
Simple and Infinite subtitles (see Subpicture Streams) generally contain text, which tends to become distorted and difficult to read when resized. These subtitle types also do not require exact positioning with respect to the background. For these reasons, in Widescreen 16:9 projects ReelDVD handles Simple and Infinite subpictures for subtitles differently than it handles Menu subpictures (see Menu Subpictures for 16:9 Widescreen).
For subtitles, ReelDVD does not automatically create an additional subpicture stream containing subtitle images that have been resized for letterboxed display. That means that when subtitles are viewed on a 16:9 Widescreen television, the subtitles will tend to be wider than normal because their pixels are stretched to a 16:9 aspect ratio. (This distortion has far less impact on readability than would resizing the images.)
|
Sonic Solutions/ Voice: 415.893.8000 Fax: 415.893.8008 info@sonic.com |